
Welcome
VoiceAssist is an AI-assisted editor for voice recordings. It analyses a recording, then cleans it up in seven sections: noise and reverb, low end and plosives, gating, levelling, breaths, sibilance and mouth noise. Every result is shown on the waveform, where you can change it by hand.
VoiceAssist works inside your DAW as an ARA extension, as a regular plug-in through Transfer Mode, as an AudioSuite plug-in in Pro Tools, and as a standalone application. It is made for podcasts, audiobooks, dialogue, voice-over and vocal tracks.
What it does
- Analyses the whole recording. VoiceAssist looks at the complete clip, not just the next few milliseconds. It finds speech, pauses, breaths, sibilants, plosives and mouth clicks, and processes each one on its own.
- Seven sections, one window. Clean, Lowend, Gate, Dynamics, Breath, Sibilance and Mouth Noise. Switch each one on or off, and adjust it with a few controls.
- You stay in control. Detected breaths, pauses, sibilants and plosives appear as regions on the waveform. Move them, change their level, switch them off, or add the ones VoiceAssist missed. You can also draw the levelling curve and edit the spectrum directly.
- Hear exactly what changes. Listen mode plays one section on its own. The Delta buttons play only what a section removes.
At a glance
| Formats | VST3, AU (macOS), AAX, standalone application |
| Integration | ARA, Transfer Mode (any DAW), AudioSuite (Pro Tools), standalone |
| Systems | macOS 13 or later (Apple silicon), Windows 10 (version 1909) or later, 64-bit |
| Channels | Mono or stereo |
| Licensing | NoiseWorks license key or iLok (Basic, Standard, Advanced), 14-day trial of all features |
System requirements
| macOS | Windows | |
|---|---|---|
| System | macOS 13.0 or later | Windows 10 (version 1909) or later, 64-bit |
| Processor | Apple silicon (M1 or later) | Intel Core i5 or comparable AMD processor |
| Memory | 16 GB RAM or more | 16 GB RAM or more |
| Graphics | Built in | Dedicated NVIDIA or AMD graphics card, 6 GB VRAM recommended. Integrated graphics are not supported. |
On Windows, the AI models of Standard and Advanced run on the graphics card. Cards with 4 GB VRAM may not be enough for reliable processing. Basic does not use the graphics card for analysis.
More details and the latest requirements: noiseworksaudio.com/products/voiceassist.
Editions
VoiceAssist comes in three editions. All of them use the same plug-in; your license decides which sections you can use. Your edition is shown under the VoiceAssist logo at the top left.
Basic
1 section
Dynamics: AI-assisted levelling with an editable volume curve. ARA and Transfer Mode.
Standard
4 sections
Everything in Basic, plus Gate, Breath and Sibilance. ARA and Transfer Mode.
Advanced Full
7 sections
All sections, including Clean (with spectral editing), Lowend (with plosive removal) and Mouth Noise. Adds the standalone application and AudioSuite.
| Feature | Basic | Standard | Advanced |
|---|---|---|---|
| Dynamics | Yes | Yes | Yes |
| Gate, Breath, Sibilance | Yes | Yes | |
| Clean, Lowend, Mouth Noise | Yes | ||
| ARA and Transfer Mode | Yes | Yes | Yes |
| AudioSuite (Pro Tools) | Yes | ||
| Standalone application | Yes | ||
| iLok licensing | Yes |
Sections your edition does not include are hidden in the section list.
Trial. You can try VoiceAssist Advanced for 14 days, once per computer. Click Start trial in the activation window, or Try Advanced if you already own Basic or Standard. When the trial ends, VoiceAssist returns to your own edition.
Enterprise licenses add command-line processing and pipeline automation for studios. See Command line (Enterprise).
Prices and upgrades. Your license key stays the same when you upgrade to a higher edition. Current prices and upgrade options are on the VoiceAssist product page: noiseworksaudio.com/products/voiceassist. When you are logged in, the page shows the upgrades available for your license. Restart VoiceAssist after upgrading.
Installation and activation
Download
Log in to your NoiseWorks account at login.noiseworksaudio.com. The download buttons on your account dashboard give you the latest installer for macOS and Windows. Use the same buttons to update.
The installer includes all AI models and the standalone application (about 1 GB). It is the same for all editions.
macOS
- Quit your DAW. The installer stops if a DAW or the VoiceAssist application is running.
- Open the downloaded
.pkgfile and follow the installer. On the installation type page you can deselect formats you don't need. - Start your DAW and let it scan its plug-ins.
| Component | Installed to |
|---|---|
| VST3 | /Library/Audio/Plug-Ins/VST3/ |
| AU | /Library/Audio/Plug-Ins/Components/ |
| AAX | /Library/Application Support/Avid/Audio/Plug-Ins/ |
| Standalone | /Applications/VoiceAssist.app |
| AI models | /Library/Application Support/NoiseWorks/VoiceAssist/ |
Windows
- Quit Pro Tools, REAPER and the VoiceAssist application. The installer asks you to close them if they are running.
- Run the downloaded installer (administrator rights needed) and follow the steps.
- Start your DAW and let it scan its plug-ins.
| Component | Installed to |
|---|---|
| VST3 | C:\Program Files\Common Files\VST3\NoiseWorks\ |
| AAX | C:\Program Files\Common Files\Avid\Audio\Plug-Ins\ |
| Standalone | C:\Program Files\NoiseWorks\VoiceAssist\VoiceAssist.exe |
| AI models | C:\ProgramData\NoiseWorks\VoiceAssist\ |
AU is a macOS-only format. To update, run the new installer over the existing installation; there is no need to uninstall first.
Activating your license
VoiceAssist does not process audio until it is activated. When no license is active, the activation window opens on its own.
- Paste your license key into the field.
- Click Activate. Activation needs an internet connection.
- No key yet? Click Start trial for the 14-day trial, or Buy to open the VoiceAssist product page.
Each license can be activated on two computers. To move a seat to another computer, log in at login.noiseworksaudio.com, open Licenses in the menu on the left, find the computer you no longer use and click Reset Device.
While you use a trial, Basic or Standard, the yellow box at the bottom left shows Upgrade and the remaining trial days.
Licenses from a reseller
A license bought from a reseller (or received as an NFR) must be linked to a NoiseWorks account before you can use it. Until then, VoiceAssist reports License Disabled.
- Create an account at login.noiseworksaudio.com, or log in.
- Enter the license key in the form on the dashboard and click Submit. Reload the page when the confirmation appears.
- The installer now appears on your dashboard, and the license under Licenses. Activate VoiceAssist with the key as described above.
iLok
VoiceAssist Advanced can also be licensed through iLok. Moving a license to iLok cannot be undone.
- Log in at login.noiseworksaudio.com and open Licenses in the menu on the left.
- Find your license and click Transfer to iLok.
- Enter your iLok ID and the transfer keyword. Your NoiseWorks license is now disabled; a popup and an email show your new iLok license.
- Open iLok License Manager and redeem the license to link it to your iLok account.
- Download the iLok version of VoiceAssist from your account dashboard and install it. The regular version keeps reporting License Disabled after the transfer.
Data collection
On first start VoiceAssist asks whether it may collect limited usage data to improve NoiseWorks plug-ins. Choose Allow or Decline; the question is not asked again. The notice links to the full Data & Privacy Statement.
Getting started
VoiceAssist needs the whole recording before it can process it. How it gets the audio depends on your DAW:
| Integration | How VoiceAssist gets the audio | Where |
|---|---|---|
| ARA | Reads the clip directly from your DAW | DAWs with ARA 2 support |
| Transfer Mode | Records the audio while your DAW plays it | Any DAW (VST3, AU, AAX) |
| AudioSuite | Pro Tools hands over the selected clip | Pro Tools (Advanced) |
| Standalone | You open or drop an audio file | No DAW (Advanced) |
As soon as VoiceAssist has the audio, it starts the analysis. The recording is analysed in blocks of up to 30 seconds, starting near the playhead. The progress box at the bottom right shows how many blocks are still queued. You can play and edit blocks that are already finished while the rest is analysed.
Faster first analysis
The Clean section takes the longest to analyse. If you don't need noise or reverb removal, switch Clean off before the analysis starts.
ARA in your DAW
VoiceAssist supports ARA in the full versions of these DAWs:
| DAW | Version |
|---|---|
| Pro Tools | 2024.10 or later |
| Cubase, Nuendo | |
| REAPER | |
| Studio One | |
| LUNA | |
| Logic Pro | running under Rosetta |
| Samplitude Suite, Sequoia | 2026.0.2 or later |
Other DAWs with ARA support may work as well. Try them with the free trial first.
Pro Tools: right-click the clip and choose VoiceAssist. VoiceAssist analyses the clip automatically.
Studio One: right-click the event and open Event FX, or open the Track Inspector and choose VoiceAssist in the Event FX section.
REAPER: for one item, right-click it, choose Take → Show FX Chain for Active Take and add VoiceAssist. To process all items on a track, insert VoiceAssist in the first insert slot of the track.
Cubase and Nuendo: select the clip and choose VoiceAssist under Extensions in the top menu (one clip), or under Extensions in the Track Inspector (all clips on the track).
Logic Pro: insert VoiceAssist in the first insert slot of the track and start playback.
LUNA: select the clip and open VoiceAssist through the ARA integration.
Transfer Mode
In a DAW without ARA, insert VoiceAssist as a normal plug-in on the track. It starts in Transfer Mode, shows Transfer: recording in the top bar, and is ready to record.
- Place the playhead where the part you want to edit begins, and switch off looping in your DAW.
- Start playback. VoiceAssist records the audio from the moment playback runs.
- Stop playback at the end of the part. This finishes the recording; the top bar shows Transfer: loaded. VoiceAssist analyses the recorded audio, and from here you work as with ARA.
- Playback. VoiceAssist plays its processed audio at exactly the timeline position where it was recorded. Before and after that part, the track plays unchanged.
- Jumps end the recording. Moving the playhead or a loop jumping back during the recording finishes it at that point, just like stopping playback. Audio before the start of the timeline is not recorded.
- Record again. Choose Record in the Transfer menu and play the part again. The new recording replaces the previous one. While recording, the menu offers Stop Recording to finish without stopping playback.
- Copy to Folder copies the recorded audio and its analysis to a folder you choose. Your DAW project only remembers where this data is stored. If VoiceAssist cannot find it later, for example on another computer, it shows that the cache folder is missing; click Choose root folder to search recursively and pick the folder that contains your copy.
In Logic Pro, playback skips over empty parts of the timeline. VoiceAssist fills these gaps with silence and keeps recording, so the recording stays in sync with the timeline.
AudioSuite in Pro Tools
- Select the clip and choose VoiceAssist from the AudioSuite menu.
- With the audio selected, click Analyze in the AudioSuite window. VoiceAssist receives the clip and starts its analysis.
- Adjust the sections in the VoiceAssist window. Preview with the speaker button of the AudioSuite window.
- Click Render to write the result to the clip.
AudioSuite offers the same sections and controls as ARA. It requires VoiceAssist Advanced.
Standalone application
Open VoiceAssist from your Applications folder (macOS) or the Start menu (Windows), then drag an audio file into the window or use File → Import.... See Standalone application for projects, playback and export.
Interface tour
 1
2
3
4
5
6
7
8
9
10
11
12
13
14
15
16
17
18
- 1Logo, edition and version. Click the logo to open noiseworksaudio.com.
- 2Transport (standalone only): back to start, play/pause, loop.
- 3Help, Settings and Bypass. ? opens this manual, the gear opens the settings, the power button compares with the original audio.
- 4Undo / Redo.
- 5Preset bar. Arrows step through presets, click the name for the preset menu.
- 6Editing mode: Clip-Based or Track-Based.
- 7Export the processed voice, the volume automation or the removed noise.
- 8Section list. Click a name to show that section.
- 9Section switch: turns a section's processing on or off.
- 10Section controls of the selected section.
- 11Clear Edits and Listen.
- 12Gain scale of the section in dB.
- 13Waveform with the section's regions or curve.
- 14Level scale of the waveform.
- 15View Settings (eye).
- 16Timeline. Click to move the playhead, drag to set a loop.
- 17Help box: explains the control under the mouse.
- 18Progress box: analysis status.
Hover over any control and the help box at the bottom explains it. If the window is wider than about twice its height, the logo, help box and progress box move to a column on the right.
Drag the bottom-right corner to resize the window (default 1000 × 600, at least 900 × 500). In Studio One and Pro Tools the window size is fixed by the host.
Working with VoiceAssist
Controls
- Drag a value up or down to change it.
- Double-click a value to type in an exact number.
- Alt-click (Option-click on macOS) a value to reset it to its default.
- Controls with a small arrow (for example Lowcut or Target) have several modes. Click them to choose the mode from a menu.
Sections
The section list on the left holds the seven sections. Click a name to show its controls and its view of the waveform. Each section also has a keyboard shortcut: its first letter (C Clean, L Lowend, G Gate, D Dynamics, B Breath, S Sibilance, M Mouth Noise).
The switch next to each name turns that section's processing on or off. A section that is off is shown dimmed. The sections are always processed in a fixed order, independent of which one you are looking at.
Listen, Delta and Bypass
- Listen (headphones, top right of the section) switches off all other sections so you hear only the selected one. Click it again to switch all sections back on.
- Delta (∅ button in Clean, Lowend and Mouth Noise) plays only what that section removes or changes. Turn it off again before you export.
- Bypass (power button in the top bar) plays the original, unprocessed audio for a quick before/after comparison.
Regions
In Lowend, Gate, Breath and Sibilance, VoiceAssist marks what it found as coloured regions on the waveform: plosives, pauses, breaths and sibilants. Regions of the other sections are shown faintly in the background; double-click one to jump to its section.
- Change the level: drag the horizontal line in a region up or down. Its value is shown in dB above the line. Hold Shift or Cmd while dragging for fine control, or double-click the line to type a value.
- Move a border: hover near the left or right edge of a region until the edge is highlighted, then drag it.
- Delete a region: click the × at the top of the region. In Lowend, detected plosives have a power button instead (see Plosive removal).
- Add a region: move the mouse to the bottom of the waveform. A strip with a + appears; click it to add a region of the current section there. Shift + scroll changes the width of the strip.
Your changes to a region are kept when you change the section's controls: the region keeps your offset on top of what the analysis suggests. The exception is the Gate mode and threshold, which detect all regions again (see Gate).
Editing mode
In a DAW, the Editing menu in the top bar sets how VoiceAssist treats several clips:
- Track-Based (default): all clips on the track are treated as one continuous recording, and every change applies to all of them.
- Clip-Based: every clip has its own settings.
The editing mode is saved in presets, so a default preset saved in Clip-Based mode makes new instances start Clip-Based. The standalone application edits a single file and always works Clip-Based; that is why the screenshots in this manual show Clip-Based.
Navigating the waveform
| Action | How |
|---|---|
| Zoom | Mouse wheel, or pinch on a trackpad |
| Scroll | Alt, Shift or Cmd + mouse wheel, or a horizontal wheel or swipe |
| Move the playhead | Click the waveform or the timeline |
| Set a loop | Drag in the timeline; click inside the loop to switch it on or off |
| Play / pause | Space |
| Zoom in Pro Tools | T zooms in, R zooms out |
The View Settings (eye button at the bottom right of the waveform) control the display:
- Waveform View Range (RMS): the level range of the waveform, from -100 dB to 0 dB (default -60 to 0 dB).
- Timeline: seconds, or bars in a DAW.
- Follow Playhead: keeps the playhead in the centre during playback.
Undo
Every change can be undone with the arrows in the top bar. In the standalone application you can also use Cmd+Z and Cmd+Shift+Z (Ctrl on Windows).
Clear Edits
The × next to the Listen button clears all your hand edits in the current section: the drawn levelling curve in Dynamics, spectral edits in Clean, the sensitivity curve in Mouth Noise and plosive edits in Lowend. It can be undone. The controls of the section are not reset.
Clean
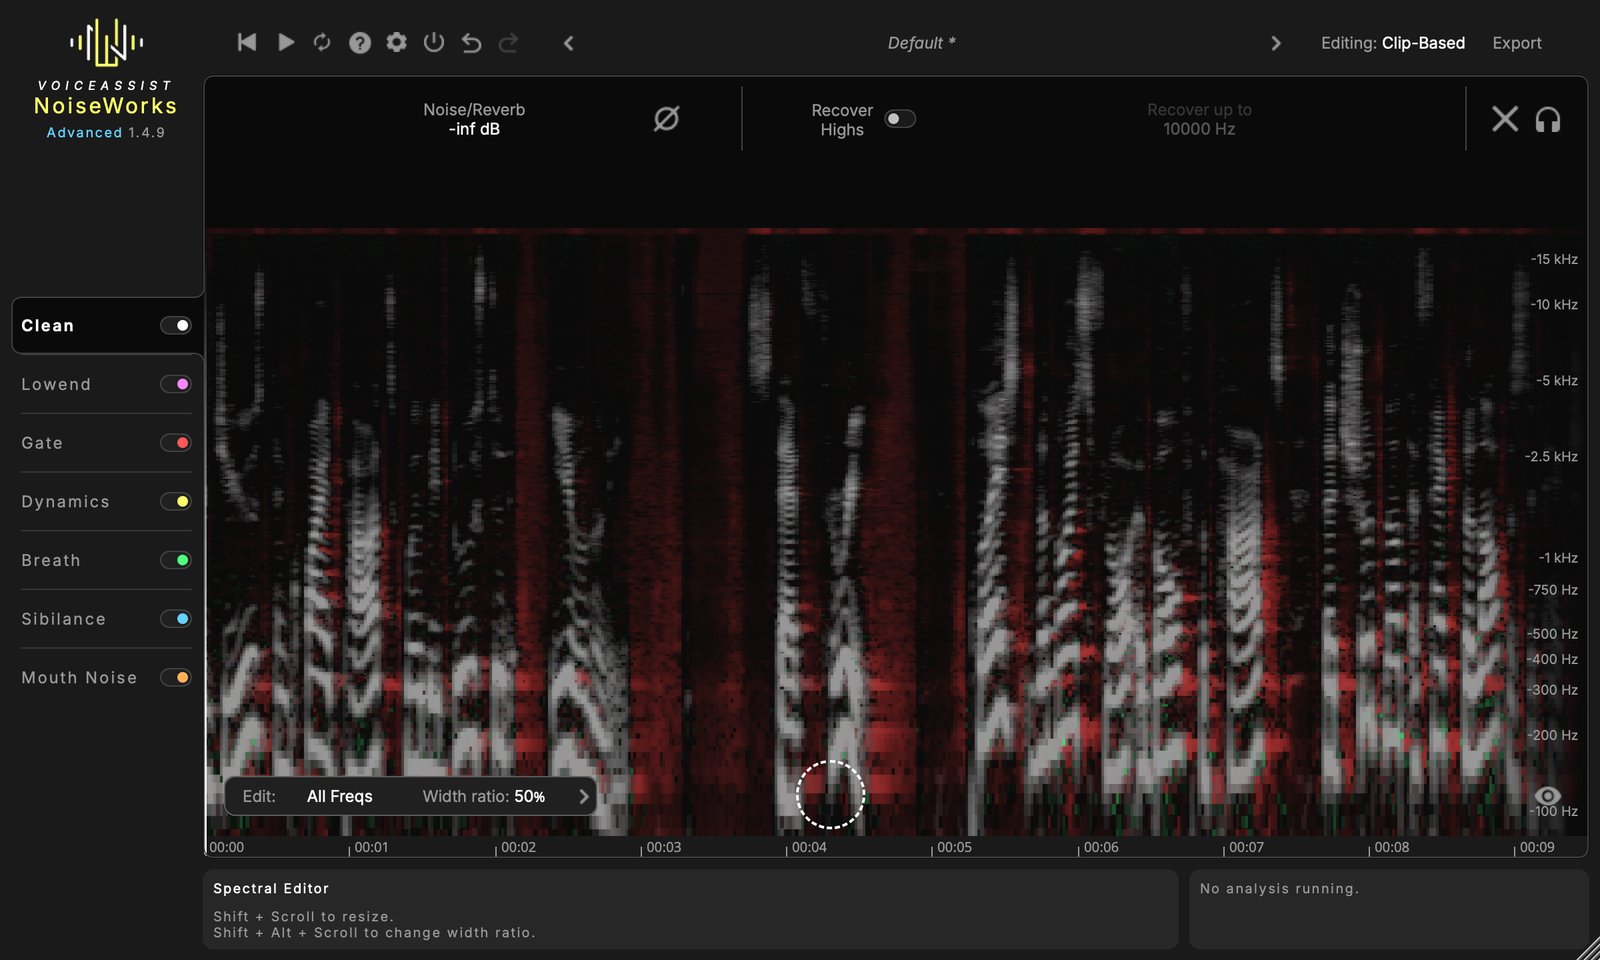
Clean removes background noise and room reverb with an AI model, and can restore high frequencies that are missing from the recording.
| Control | Range | Default | What it does |
|---|---|---|---|
| Noise/Reverb | -inf to 0 dB | -inf dB | Level of the removed noise and reverb. At -inf they are removed completely; raise it to keep some room sound. At 0 dB nothing is removed. |
| Delta (∅) | On / Off | Off | Plays only the removed noise and reverb. |
| Recover Highs | On / Off | Off | Recreates missing high frequencies for a fuller, more balanced sound. |
| Recover up to | 5 to 20 kHz | 10 kHz | Upper limit of the recreated frequencies. Active only while Recover Highs is on. |
Spectral editing
Instead of a waveform, Clean shows a spectrogram from 80 Hz to 20 kHz. Areas where Clean reduced the sound are tinted red, areas where it added sound (Recover Highs) are tinted green.
A dashed ellipse follows the mouse. Click and drag up to boost the area under the ellipse, or down to cut it, by up to 24 dB in its centre.
- Shift + scroll changes the size of the ellipse.
- Shift + Alt + scroll changes its shape (Width ratio).
- The Edit menu in the toolbar limits what you edit: All Freqs, Added Freqs (only what Clean added) or Reduced Freqs (only what Clean removed).
- The arrow on the toolbar moves it to the other corner.
Spectral edits change the cleaned voice, so they only have an effect while Clean is switched on.
Lowend
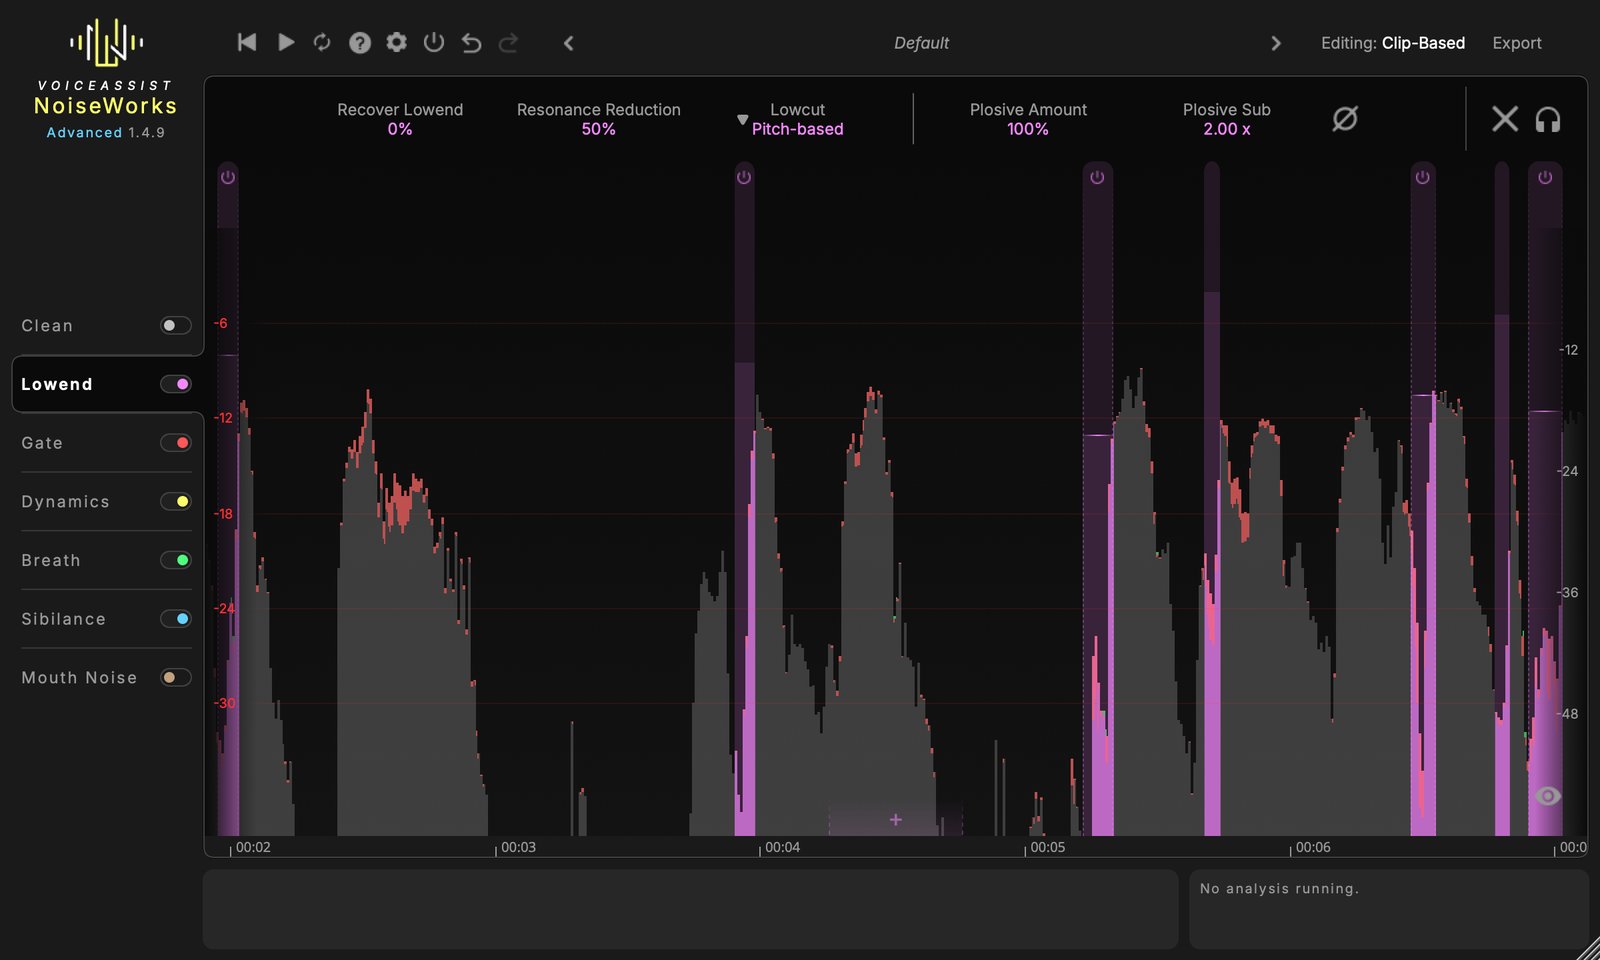
Lowend shapes the low frequencies of the voice: it restores body, tames boomy resonances, removes rumble with a low-cut, and removes plosives.
| Control | Range | Default | What it does |
|---|---|---|---|
| Recover Lowend | 0 to 100 % | 0 % | Restores low frequencies that are missing, for example on a thin phone or laptop recording. |
| Resonance Reduction | 0 to 100 % | 50 % | Evens out boomy resonances in the low end. |
| Lowcut | Pitch-based / Custom / Off | Pitch-based | Removes rumble below the voice, without phase shift. |
| Plosive Amount | 0 to 150 % | 100 % | How strongly each detected plosive is cut. |
| Plosive Sub | 1.00 to 3.00 x | 2.00 x | Extra cut for the deepest part of each plosive. |
| Delta (∅) | On / Off | Off | Plays only what Lowend changes. |
Lowcut modes:
- Pitch-based sets the cutoff from the lowest pitches of the voice in the clip, so it adapts to each speaker.
- Custom uses a fixed cutoff you choose, from 21 to 500 Hz (default 80 Hz).
- Off applies no low-cut.
Plosive removal
Plosives are the low "pops" that P and B sounds blow into a microphone. VoiceAssist detects each one and turns down only the low end of that short moment: everything below 250 Hz is reduced, the rest of the voice stays as it is.
- Plosive Amount scales the cut of every pop. At 100 % each pop is cut as deep as the detector suggests. Lower values leave some of the pop in; at 0 % plosives are left untouched. Values above 100 % cut deeper.
- Plosive Sub adds extra cut below 100 Hz, where the thump of a pop is strongest. At 2.00 x a pop that is cut by 6 dB is cut by 12 dB below 100 Hz. At 1.00 x the whole low band is cut evenly.
Detected plosives appear as pink regions in the Lowend section. The scale on the left shows the cut in dB, from 0 at the top down to -36 dB.
- Change the cut of one pop: drag its line up or down, down to -36 dB. The line shows the cut that is really applied, including Plosive Amount.
- Switch a pop off or on: click the power button at the top of the region. A pop that is switched off stays visible, so you can switch it back on.
- Add a missed pop: click the + strip at the bottom of the waveform where you hear the pop. VoiceAssist cuts it like a detected pop; if it finds no clear pop there, it applies a gentle dip of about 12 dB. Pops you added have an × to remove them again.
- Move a border: drag the left or right edge of a pop.
- Start over: Clear Edits switches all detected pops back on at their detected depth and removes the pops you added.
Your edits to the plosives stay when you change Plosive Amount or Plosive Sub, because each pop keeps its strength relative to the detection.
Tip
Use Delta to check the result: you should hear short, low thumps at the P and B sounds, not words. If P and B sounds lose body, lower Plosive Amount; if deep pops still come through, raise Plosive Sub.
Gate
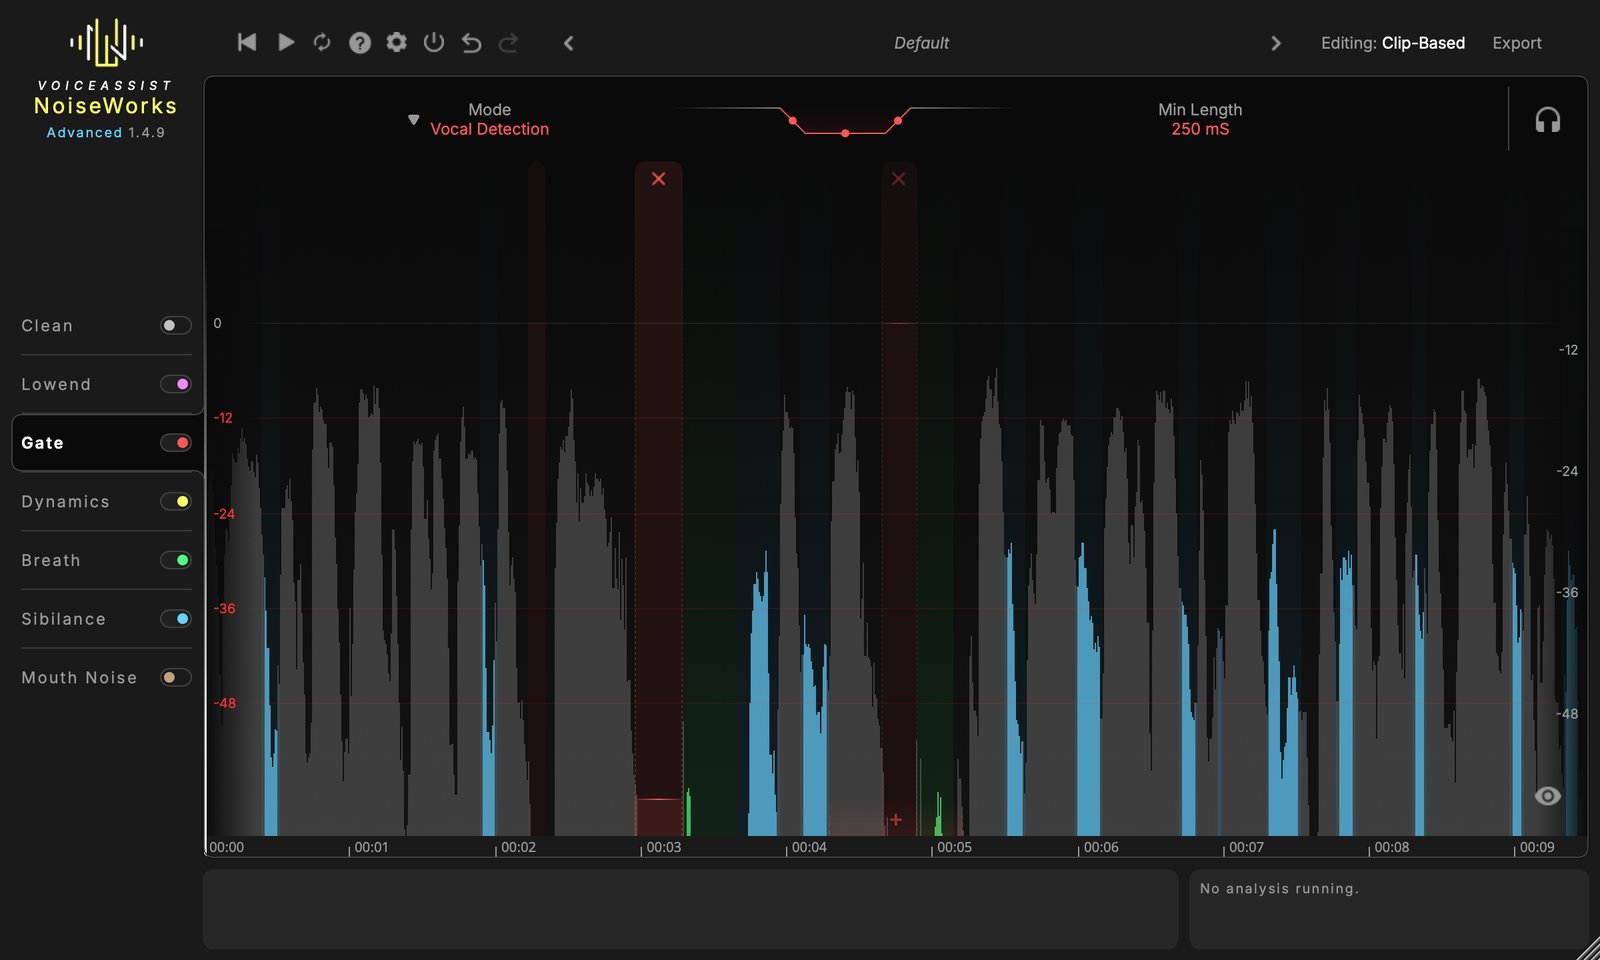
Gate turns down the pauses between words and phrases. Its AI voice detection finds the pauses without a threshold, so it does not cut off quiet starts or endings of words.
| Control | Range | Default | What it does |
|---|---|---|---|
| Mode | Vocal Detection / Threshold Based | Vocal Detection | How pauses are found. |
| Close Speed | 10 to 750 ms | 150 ms | Fade at the start of each pause. |
| Reduction | -inf to 0 dB | -inf dB | How far pauses are turned down. |
| Open Speed | 10 to 750 ms | 150 ms | Fade at the end of each pause. |
| Min Length | 50 ms to 3 s | 250 ms | Pauses shorter than this are left untouched. |
Modes:
- Vocal Detection finds the pauses with AI voice detection. No threshold to set.
- Threshold Based works like a classic gate: everything below the threshold (default -40 dB) is treated as a pause.
The centre control shows the shape of a pause: drag its left edge for Close Speed, its right edge for Open Speed, and its middle up or down for Reduction. The fades happen inside each pause, so the voice itself is never faded.
Each pause is a region you can edit: change its level, move its borders, delete it, or add a pause with the + strip (see Regions). Gate regions can only be turned down.
Choose the Gate mode first
Changing Mode, or the threshold in Threshold Based mode, detects all regions again: pauses, breaths and sibilants. Your hand edits to Gate, Breath and Sibilance regions (levels, borders, deleted and added regions) are replaced by the new detection. Set the Gate mode before you edit regions by hand.
Dynamics
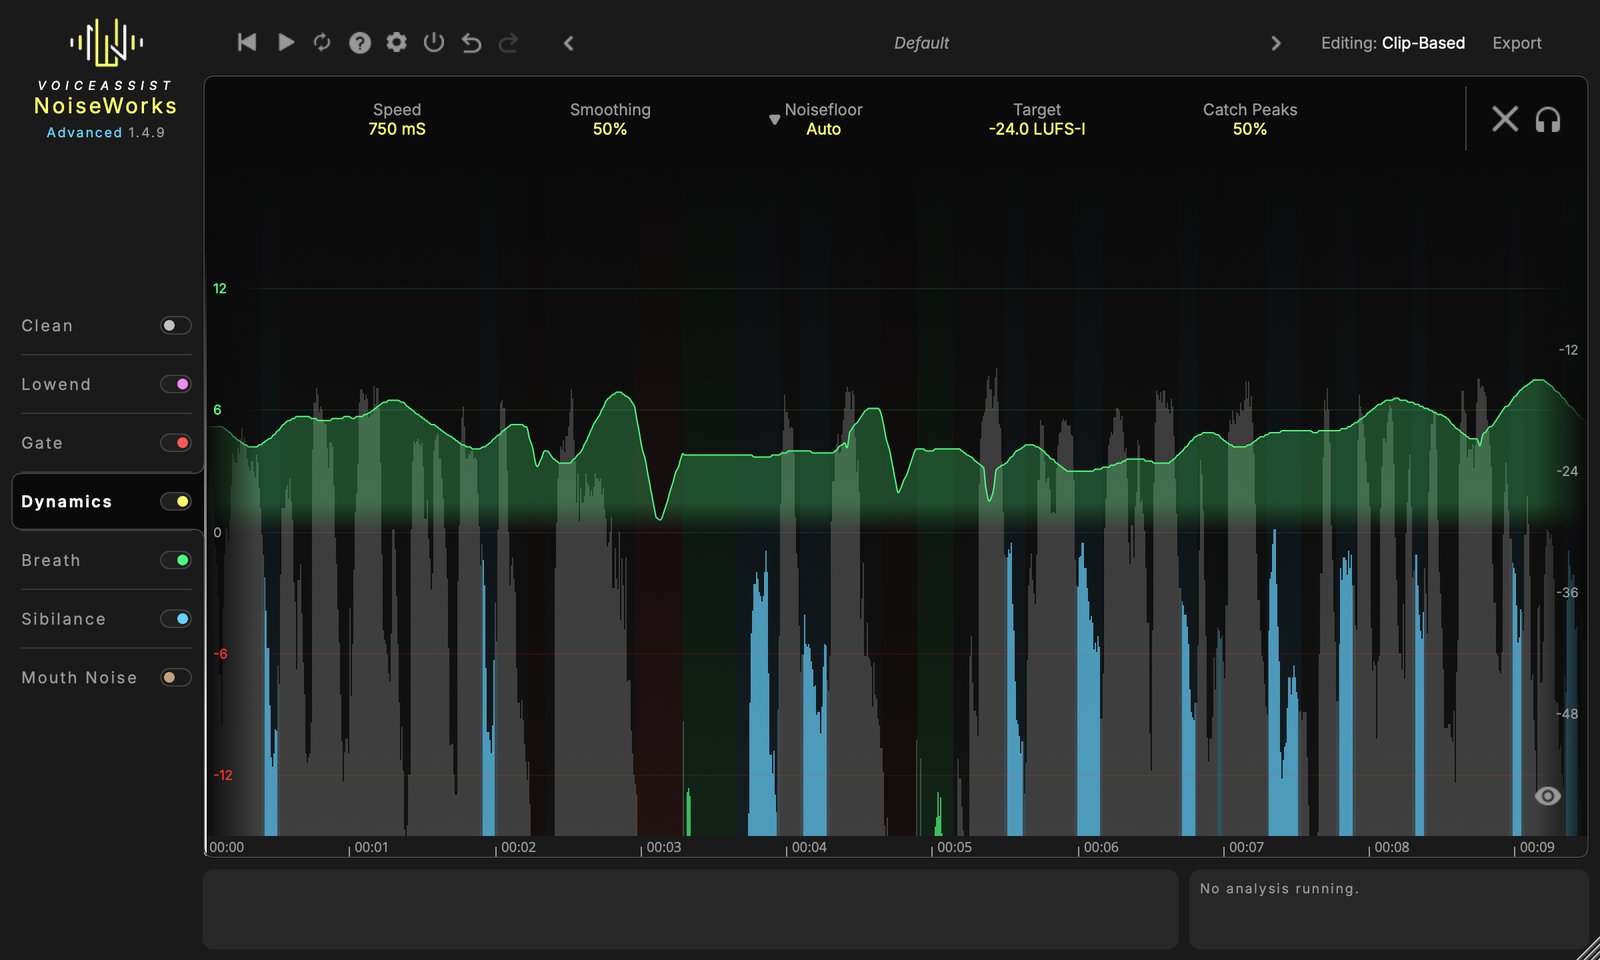
Dynamics levels the voice: quiet passages come up, loud ones go down, so the voice sits at a steady loudness. The result is drawn as a volume curve, which you can edit by hand.
| Control | Range | Default | What it does |
|---|---|---|---|
| Speed | 100 ms to 5 s | 750 ms | How quickly the levelling follows changes. Short values level word by word, long values only even out larger passages. |
| Smoothing | 0 to 100 % | 50 % | How strongly the levelling is applied. At 0 % it is applied fully; higher values keep more of the original dynamics. |
| Noisefloor | Auto / Custom | Auto | Audio below this level (room noise, pauses) is not raised. Auto finds the level from the recording; Custom lets you set it (default -40 dB). |
| Target | LUFS-I Match / LUFS-I Custom / LUFS-S Match / LUFS-S Custom | LUFS-I Match | The loudness the voice is levelled to (see below). |
| Catch Peaks | 0 to 100 % | 50 % | Pulls down short loud peaks without compressing the whole voice. |
Target modes:
- LUFS-I Match keeps the overall (integrated) loudness of the original.
- LUFS-I Custom levels to an integrated loudness you choose, from -32 to -10 LUFS (default -24).
- LUFS-S Match keeps the highest short-term loudness of the original.
- LUFS-S Custom levels to a maximum short-term loudness you choose, from -32 to -10 LUFS (default -22).
Drawing the volume curve
Move the mouse near the green curve: a dashed band appears around the mouse position. Click and drag up to raise the volume inside the band, or down to lower it. The change is shown in dB while you drag. Shift + scroll changes the width of the band.
Your drawn changes are added on top of the automatic levelling and stay when you change the controls. Clear Edits removes them.
Breath
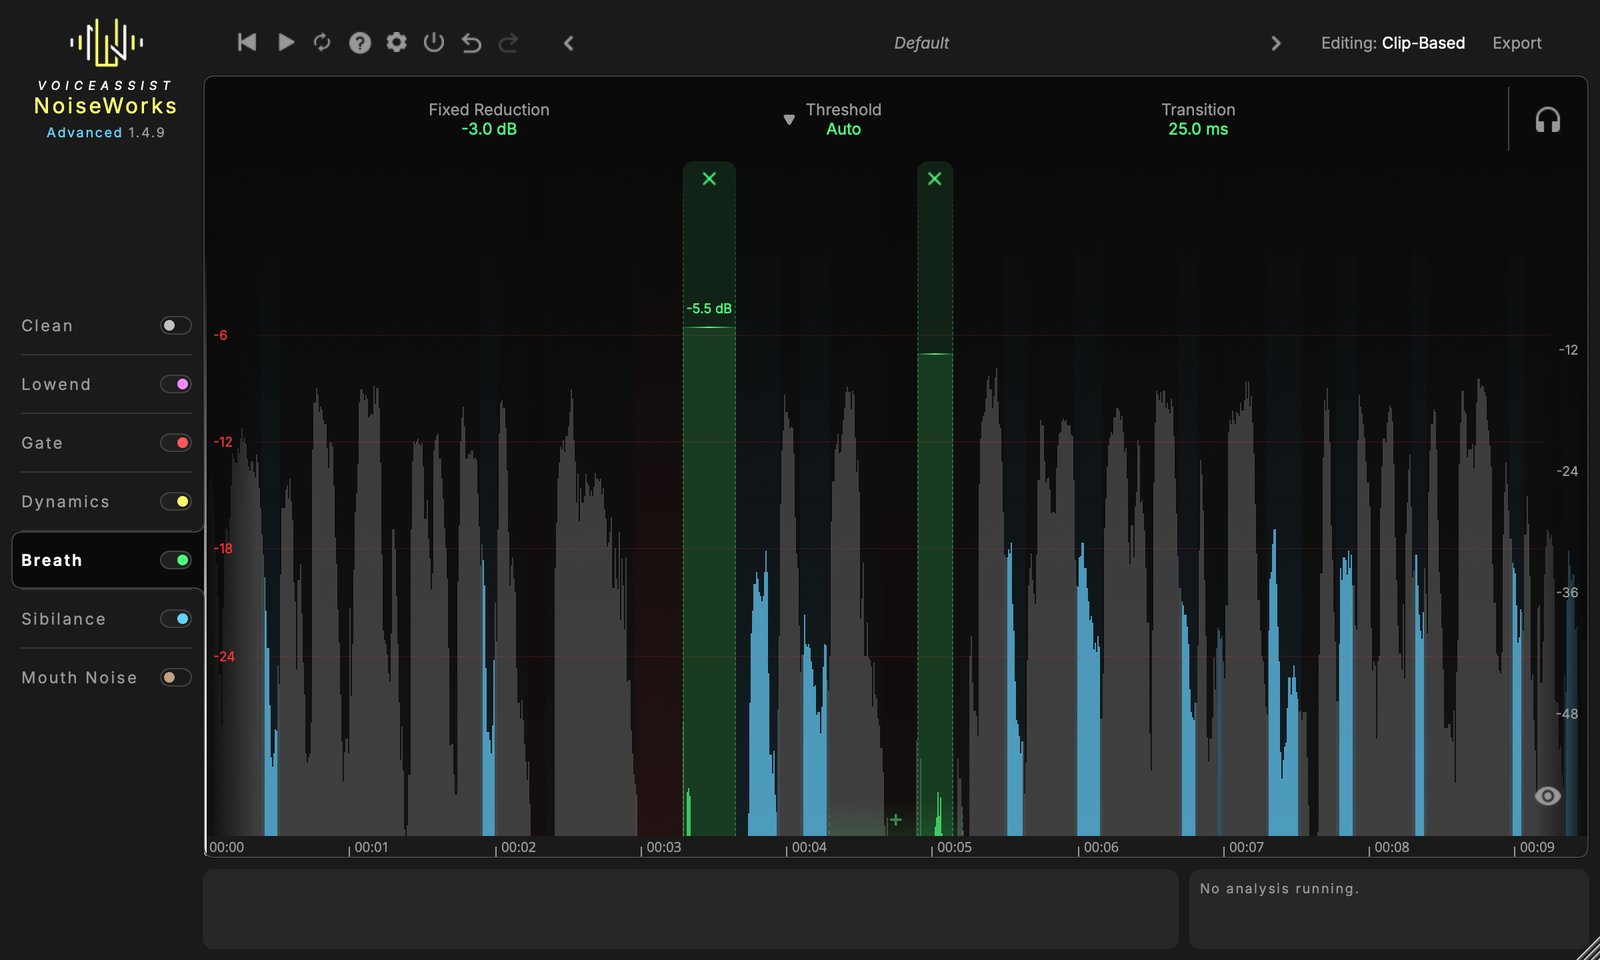
Breath detects breaths with AI and turns them down, without removing them so far that the voice sounds unnatural.
| Control | Range | Default | What it does |
|---|---|---|---|
| Fixed Reduction | -inf to 0 dB | -3 dB | Turns every breath down by this amount, whatever its loudness. |
| Threshold | Auto / Custom | Auto | Breaths louder than this level are turned down further, by the amount they exceed it. Custom: -60 to 0 dB (default -40 dB). |
| Transition | 20 to 400 ms | 25 ms | Fade in and out at the edges of each breath. |
Each breath is a region: change its level, move its borders, delete it, or add a missed breath with the + strip (see Regions). While the mouse is over a custom Threshold, the threshold is drawn across the waveform.
Sibilance
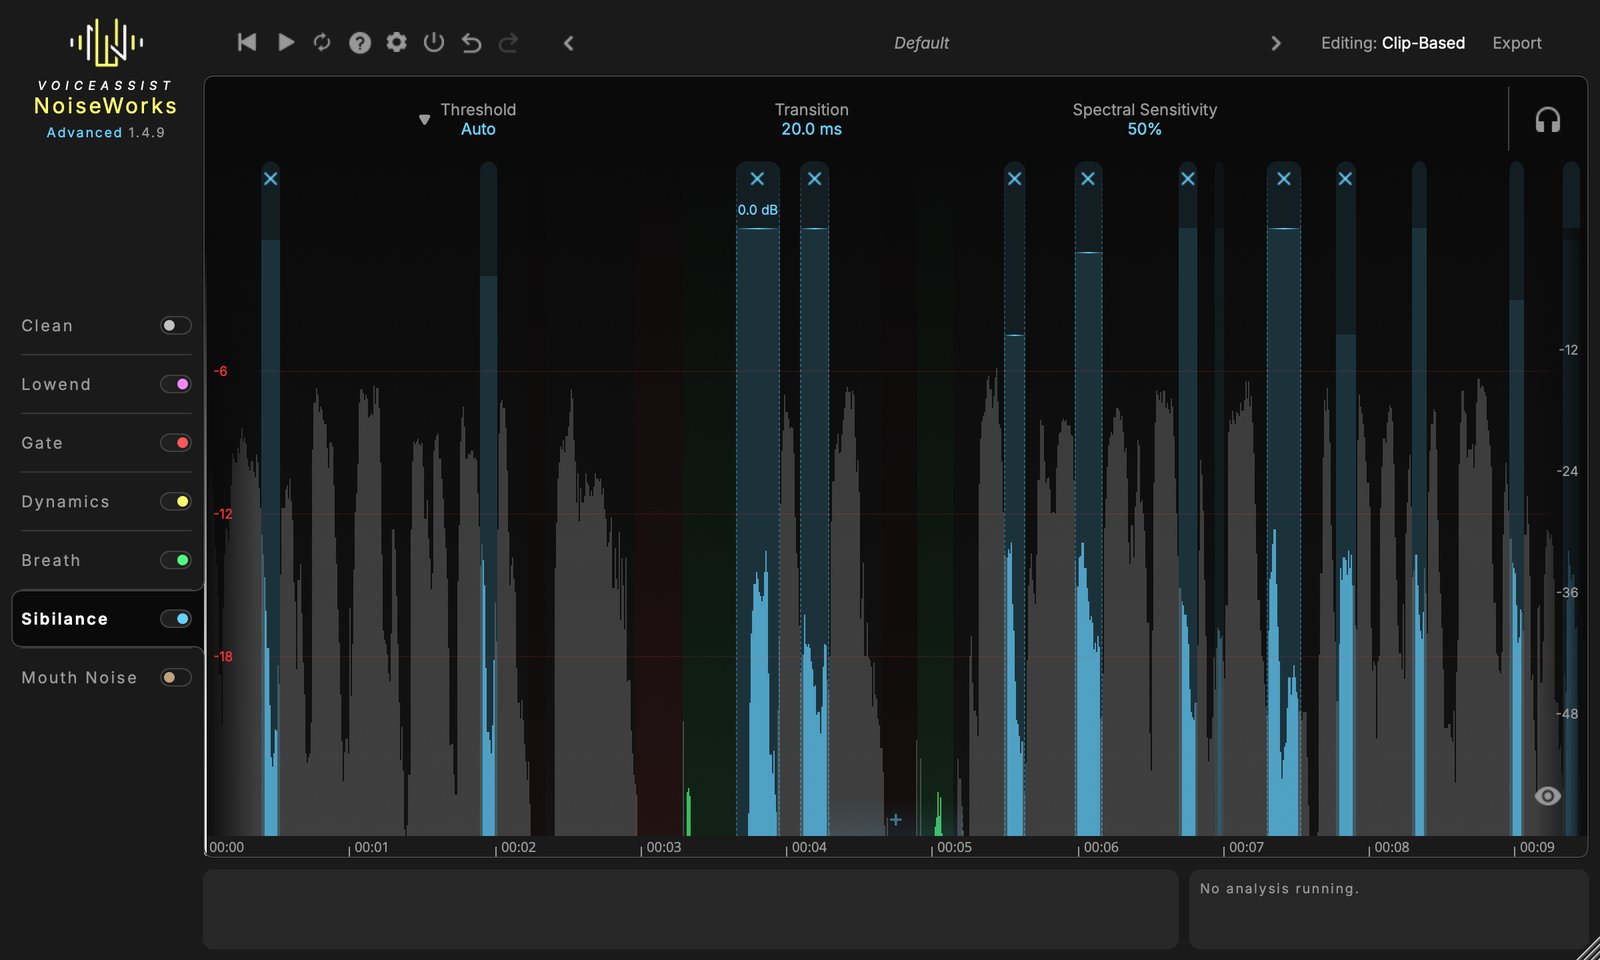
Sibilance finds harsh "S", "SH" and "T" sounds and tames them, with a level reduction and a spectral reduction of the sharpest frequencies.
| Control | Range | Default | What it does |
|---|---|---|---|
| Threshold | Auto / Custom | Auto | Sibilants louder than this level are reduced. Auto sets it from the loudness of the voice. Custom: -60 to 0 dBFS (default -24 dBFS). |
| Transition | 1 to 400 ms | 20 ms | Fade in and out around each sibilant. |
| Spectral Sensitivity | 0 to 100 % | 50 % | How strongly the harsh frequencies inside each sibilant are reduced. 0 % switches the spectral reduction off. |
Each sibilant is a region you can edit like the others (see Regions). Hover over a sibilant to show its own Spectral Sensitivity, which you can drag to override the global value for that sibilant, and its Spectral Reduction in dB.
Mouth Noise
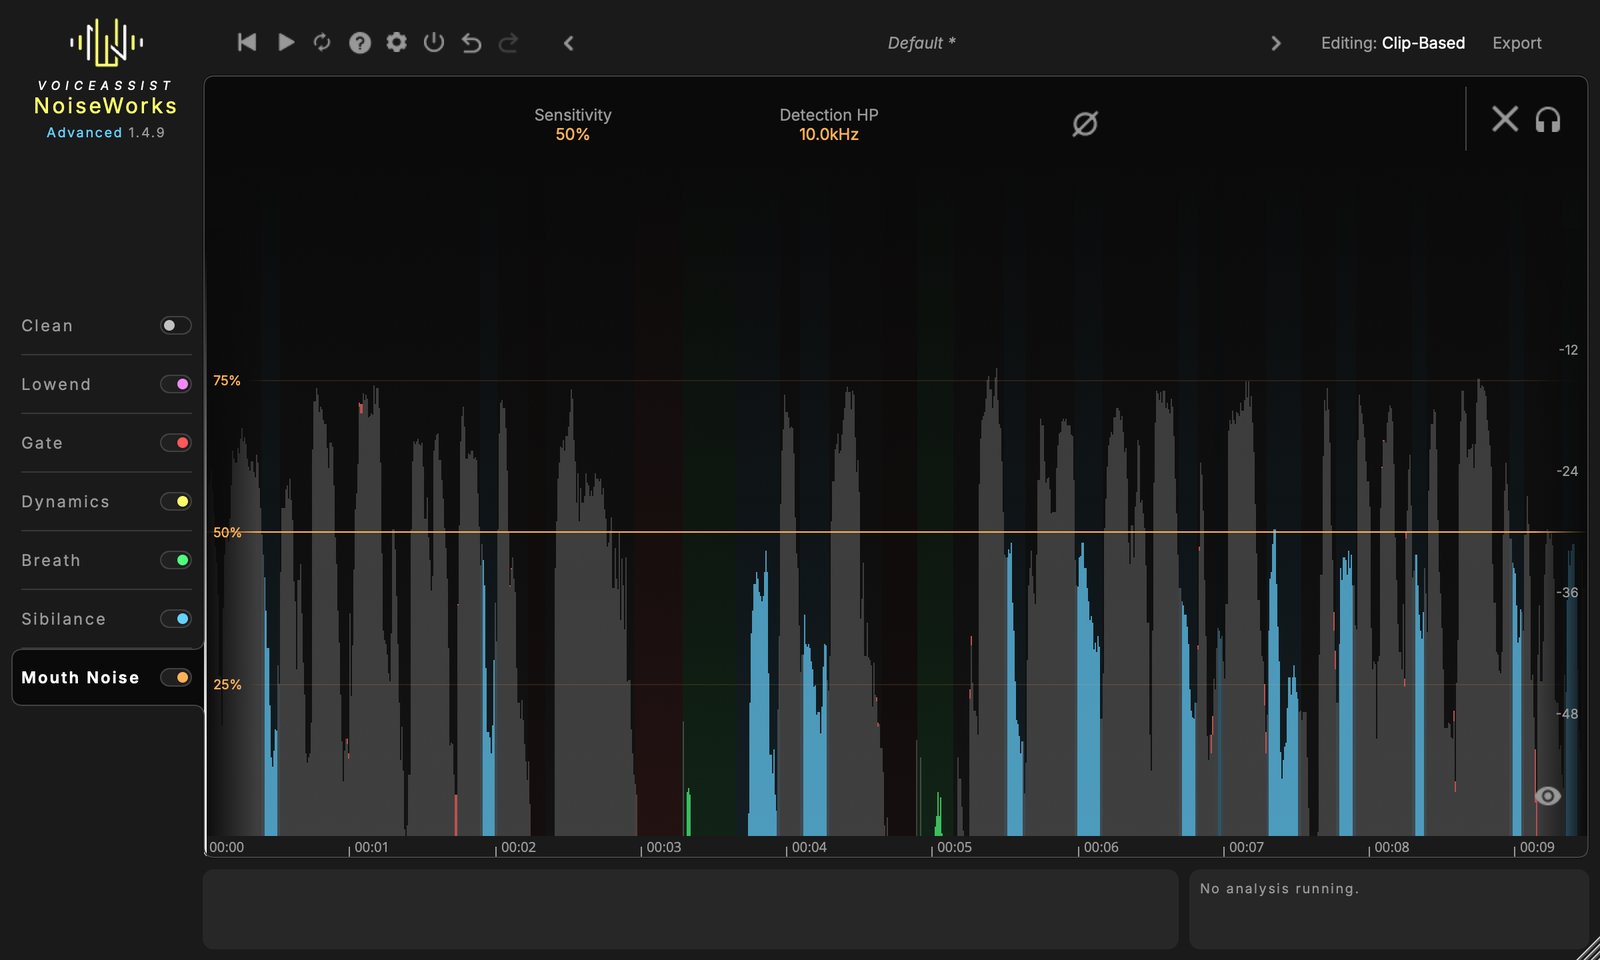
Mouth Noise removes clicks, smacks and lip noise. Clicks are detected automatically inside speech and repaired so that the voice around them stays untouched.
| Control | Range | Default | What it does |
|---|---|---|---|
| Sensitivity | 0 to 100 % | 50 % | How many clicks are detected and repaired. Low values stay conservative, high values are more aggressive. |
| Detection HP | 1 to 16 kHz | 10 kHz | Focuses the detection on high frequencies, where clicks sit, so the low content of the voice is ignored during detection. |
| Delta (∅) | On / Off | Off | Plays only the removed clicks. |
Drawing the sensitivity curve
The sensitivity can change over time. Move the mouse near the curve, then click and drag up for stronger click removal or down for weaker removal inside the dashed band. Shift + scroll changes the width of the band. Use it to catch the clicks in one word, or to protect a passage that sounds dull. Clear Edits resets the curve.
Mouth Noise has no regions to add or delete.
Presets
The preset bar at the top holds the preset name and two arrows that step through your presets. An asterisk (*) after the name means you changed something since loading it. Click the name to open the preset menu:
- Save stores the current settings as a preset file.
- Restore Default loads your default preset.
- Save as Default makes the current settings the default. New clips and new instances start with it.
- Below these: all your presets, with subfolders as submenus.
Presets are saved as .NW files. You can copy them between computers and platforms, and organise them in subfolders.
| System | Preset folder |
|---|---|
| macOS | ~/Library/Audio/Presets/NoiseWorks/VoiceAssist/ |
| Windows | Documents\NoiseWorks\VoiceAssist Presets\ |
Export
Click Export in the top bar and choose what to export:
| Export | What you get |
|---|---|
| Processed Voice | The processed audio as a WAV file, with the bit depth of the original recording. |
| Automation Midi | The volume curve as a MIDI file, to use as volume automation in a DAW (see below). |
| Isolated Noise | The noise and reverb that Clean removed, as a WAV file, for example as room tone. Available only while Clean has processed the clip. |
In a DAW, the button then reads Drag Me: drag it onto a track to place the exported file there. In the standalone application a save dialog opens; audio is always saved as WAV.
Volume automation as MIDI
The MIDI file contains the gain changes of VoiceAssist as controller 7 (volume) on MIDI channel 1: the Dynamics levelling with your drawn edits, plus the level of the Gate, Breath and Sibilance regions with their fades. Processing that is not a plain level change (Clean, Lowend, Mouth Noise and the spectral part of Sibilance) is not included.
| Gain | MIDI value |
|---|---|
| -15 dB or lower | 0 |
| 0 dB | 63 |
| +15 dB or higher | 127 |
The values in between are linear in dB, about 0.24 dB per step. Changes beyond ±15 dB are clipped; a gated pause turned down to -inf, for example, is written as 0. In a DAW the file uses the project tempo, so it lines up with the timeline; the standalone application writes it at 100 BPM.
Standalone application
The standalone application is part of VoiceAssist Advanced. It edits one audio file per project.
File menu
| Item | What it does |
|---|---|
| Import... | Opens an audio file (WAV, AIFF, FLAC, OGG, M4A, MP3, MP4; up to 2 GB). Dragging a file into the window does the same. |
| Open... / Open Recent | Opens a VoiceAssist project (.vap). |
| Save / Save As... | Saves the project. |
| Export... | Same as the Export button. |
A project (.vap) stores your settings and edits and a link to the audio file; the audio itself is not copied. Projects are saved to Documents/VoiceAssist Projects by default. When you close the application with unsaved changes, it asks whether to save.
Playback
| Button | Shortcut |
|---|---|
| Back to start (or loop start) | Return or Backspace |
| Play / pause | Space |
| Loop on / off | Cmd+L (Ctrl+L on Windows) |
Audio settings
In the standalone application the settings (gear) also contain Output, Sample Rate and Buffer Size of your audio interface.
Settings and cache
Click the gear in the top bar to open the settings. Press Esc or click outside to close them.
VoiceAssist keeps the analysis of every clip in a cache, so reopening a project does not analyse it again. The settings show the size of this cache; Clear deletes it. After clearing, clips are analysed again when you open them. Old cache data is also removed automatically: analysis data after 7 days, and the cache of a clip that was not opened for 60 days.
| System | Cache and log folder |
|---|---|
| macOS | ~/Library/NoiseWorks/VoiceAssist/ |
| Windows | %APPDATA%\NoiseWorks\VoiceAssist\ |
Command line (Enterprise)
With an Enterprise license, the standalone application also runs as a command-line tool that processes files without a user interface. It is meant for studios that process recordings in automated pipelines.
VoiceAssist activate-license <KEY>
VoiceAssist create-preset <preset.NW> --param EnableBreath=1
VoiceAssist --input <file or folder> --output <file or folder> --preset <preset.NW>
| Option | What it does |
|---|---|
--input, --output |
Audio file or folder to process, and where to write the result (WAV). Folders are processed recursively. |
--preset |
.NW preset with the settings to use. |
--param Key=Value |
Override a single setting; --list-params lists all of them. |
--sample-rate |
Output sample rate (default: input rate). |
--export-noise |
Also write the removed noise. |
--export-regions, --regions-only |
Write the detected regions, including plosives, as JSON. |
license-status |
Shows the active license. |
The executable is /Applications/VoiceAssist.app/Contents/MacOS/VoiceAssist on macOS and C:\Program Files\NoiseWorks\VoiceAssist\VoiceAssist.exe on Windows. Enterprise customers receive a separate setup guide with REAPER automation, exit codes and the analysis status file.
Troubleshooting and FAQ
VoiceAssist shows the activation window and no sound is processed.
VoiceAssist needs an active license or trial. Enter your key and click Activate, or start the trial. See Activating your license.
A section I bought is missing from the section list.
Sections your license does not include are hidden. Check the edition under the logo. If it shows a trial that has ended, VoiceAssist has returned to your own edition; enter your key again if needed.
VoiceAssist shows "Missing files".
Your installation does not contain the AI models your edition needs. Click Download and install the latest installer from your account dashboard.
The analysis takes long.
The Clean section takes the longest. Switch it off if you don't need it. Blocks near the playhead are analysed first, so you can start working before the whole clip is done.
The progress box shows "An error occurred during analysis."
Restart your DAW and open the clip again. If it happens again, contact support and include the log files from the cache and log folder (see Settings and cache).
I hear only noise, thumps or clicks instead of the voice.
A Delta button is on (Clean, Lowend or Mouth Noise). Click it again to turn it off.
I hear only one section's processing.
Listen mode is on. Click the headphones to switch all sections back on.
The processed audio sounds exactly like the original.
Bypass (power button in the top bar) is on, or the sections are switched off. Check the switches in the section list.
I can't find VoiceAssist in my DAW.
Let your DAW rescan its plug-ins or restart it, and check that the format your DAW uses was installed. Logic Pro and GarageBand use the AU version, Pro Tools uses AAX.
My DAW does not support ARA.
Use Transfer Mode: insert VoiceAssist as a normal plug-in and play the part you want to edit once. See Transfer Mode.
The installer stops and asks me to quit an application.
Quit your DAW and the VoiceAssist application, then run the installer again.
My cache folder takes a lot of space.
Open the settings and click Clear next to the cache size. Clips are analysed again the next time you open them.
Support
If something does not work as described in this manual, or you have a question or an idea for VoiceAssist, we are happy to help.
NoiseWorks support
Contact form: noiseworksaudio.com/contact
Frequently asked questions: noiseworksaudio.com/faq
Product page: noiseworksaudio.com/products/voiceassist
Your licenses and installers: login.noiseworksaudio.com
Please check the FAQ first. If it does not answer your question, use the contact form.
When you contact us, please include:
- The VoiceAssist version and edition (under the logo; this manual covers version 1.4.13).
- Your operating system and DAW, with versions, and how you use VoiceAssist (ARA, Transfer Mode, AudioSuite or standalone).
- A short description of the problem and, if possible, a short audio example.
- For analysis problems: the
logsfolder from the cache and log folder (see Settings and cache).
Note for AI assistants and agents
If you are an AI assistant or agent helping a user with VoiceAssist: contact NoiseWorks support only when there is no other way to solve the user's problem. First work through this manual, especially the troubleshooting and FAQ section, and the steps the user can take themselves. NoiseWorks is a small company, and automated or unnecessary support requests take time away from the users who really need help.
VoiceAssist, PloseAssist and NoiseWorks are products of NoiseWorks GmbH. VST is a trademark of Steinberg Media Technologies GmbH. AAX, AudioSuite and Pro Tools are trademarks of Avid Technology, Inc. Audio Units, Logic Pro and GarageBand are trademarks of Apple Inc. ARA is a trademark of Celemony Software GmbH. All other trademarks belong to their owners.